The Adventure Bite

Real Food Recipes

  • Recipes
  • Travel
  • Life
  • About Us
  • Contact Us
  • Train With Us
  • Recipes
  • Travel
  • Life
  • About Us
  • Contact Us
  • Train With Us
You are here: Home / Food / Recipes / *Easy Entertaining Dishes / How To Make A Lattice Pie Crust (Step by Step Tutorial)

How To Make A Lattice Pie Crust (Step by Step Tutorial)

Making a lattice pie crust is easy and looks so beautiful! Step by step tutorial for making a perfect crust. 

How To Make A Lattice Pie Crust-- Step by Step Tutorial! Making a lattice pie crust is easy and looks so beautiful! Step by step tutorial for making a perfect crust.
If there is something you should know about Kevin it is that the guy LOVES pie. In a crazy heart thumping way that I in my creamy pudding, creme brûlée, moist cake loving way just doesn’t understand. So it’s been a quest of mine since we met to learn how to make really REALLY good pies because….well…the way to a guys heart is through his tummy right?

Basically this means that my husband falls more in love with me everyday when I cook him new things. I love my job!

strawberry-rhubarb-pie-2

The first order of business of course was to perfect the easy flaky pie crust that makes the base of the perfect pie. And after that topping that pie with a perfect super classy lattice crust so it looks as good as it tastes was right up there in my priority list.

Let’s get started. The first order of business is of course to roll out the pie crust and cut it into strips using a sharp knife or my favorite a pizza roller!

blueberry pie-4

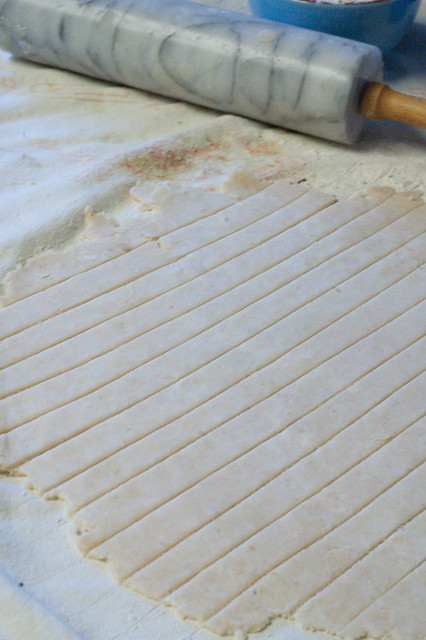
You will need 10-12 strips depending on how tight you want your lattice to be. I like using 10 strips because it is easier to get the spacing even for me with an odd number of strips (5) going each direction.

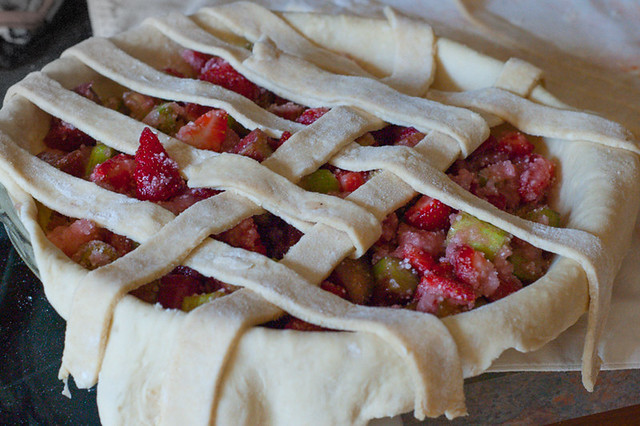
Lay out five strips in one direction and fold strip 2 and 4 back over themselves (shown below) then lay your first cross strip over strips 1, 3 and 5. Unfold strips 2 and 4 back to their original position over the top of the new cross strip.

strawberry-rhubarb-pie-4-numbered

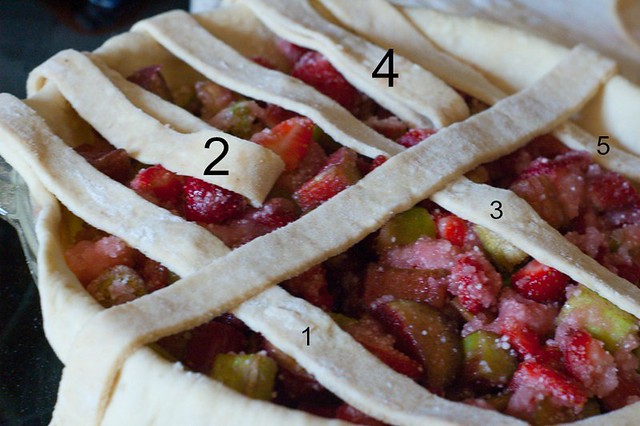
Now fold the opposite pieces back over themselves (1, 3, and 5) and lay the next cross strip down.

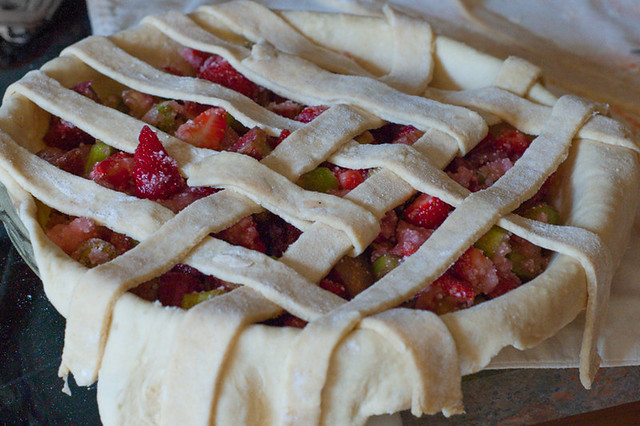
*Note: this photo was taken after one entire side had been woven into place already and the pie had been turned.

How To Make A Lattice Pie Crust (Step by Step Tutorial) Making a lattice pie crust is easy and looks so beautiful! Step by step tutorial for making a perfect crust.

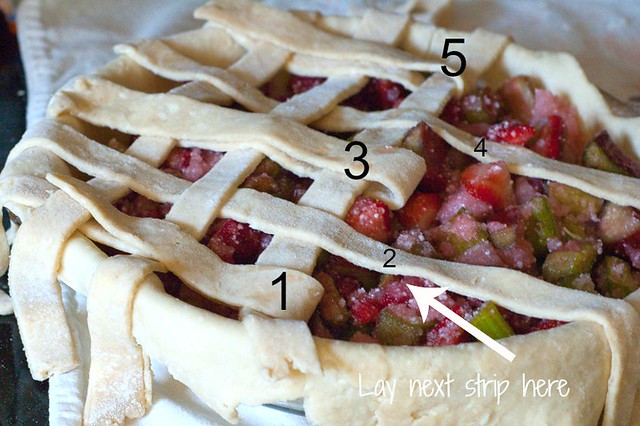
Continue repeating the alternating strips until you reach the edge of the pie.

strawberry-rhubarb-pie-6

strawberry-rhubarb-pie-7

strawberry-rhubarb-pie-8

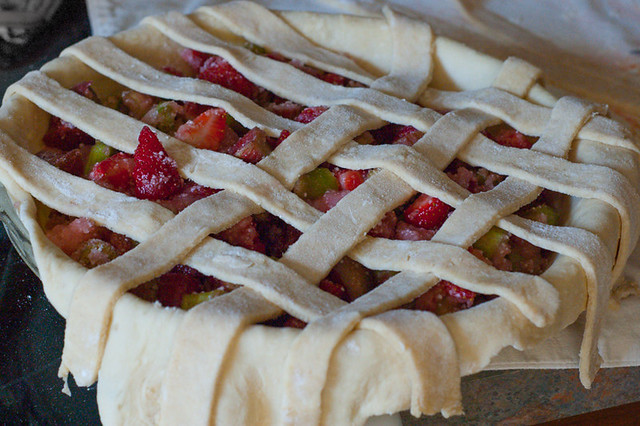
Turn the pie 180 degrees and continue the same alternating weave.

strawberry-rhubarb-pie-9

Until the entire pie is covered. Trim the excess dough to 1 inch all the way around the pie using kitchen shears.

strawberry-rhubarb-pie-10

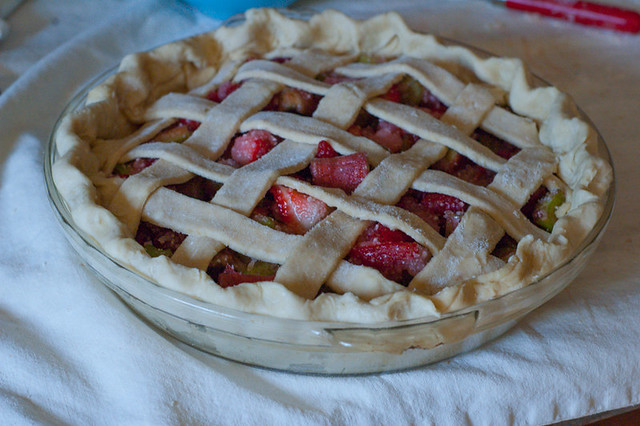
Finish the edges with your favorite edging. I like to put a simple crimp on the edge of mine by pressing my thumb from one hand in between my thumb and index finger from the opposite hand (photo tutorial of this technique here).
strawberry-rhubarb-pie-11

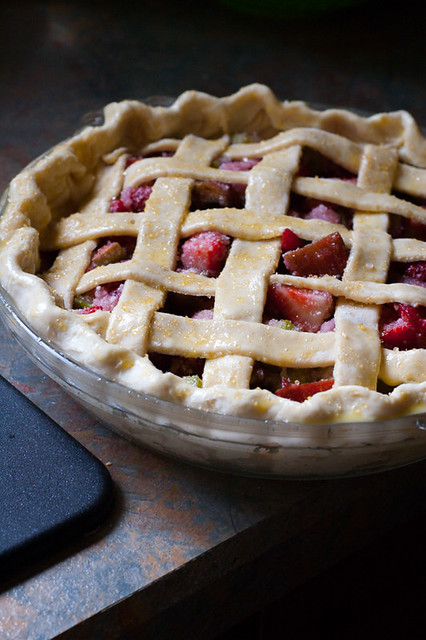
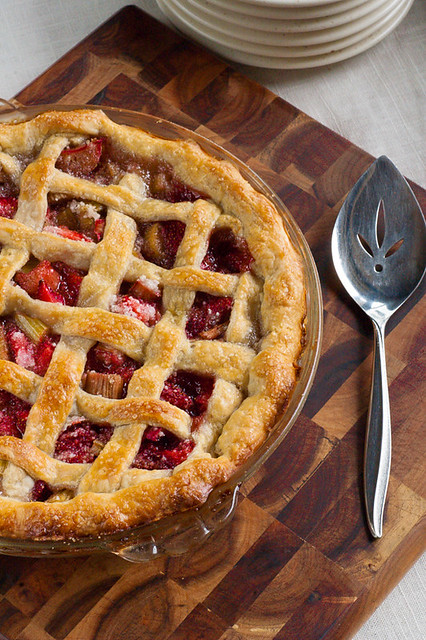
Whisk a whole egg together and using a pastry brush lightly brush the entire crust with the egg wash. Top it with coarse grain sugar to create the perfect crunchy topping.

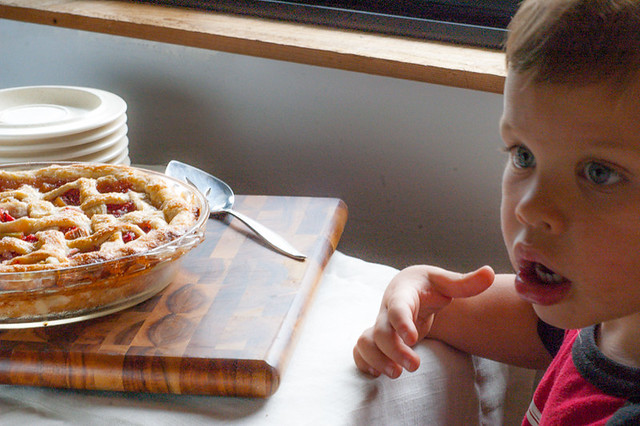
And bake it to your recipe specifics for a beautiful perfectly topped pie that will impress all the pie lovers in your life. 

strawberry-rhubarb-pie-recipe

Big and small alike…

noah-ready-for-pie

Be sure to check out some of our other posts below for ideas on what to put in your pie crusts!

strawberry-rhubarb-pie


How To Make A Lattice Pie Crust (Step by Step Tutorial)
 
Print
Prep time
15 mins
Cook time
1 hour
Total time
1 hour 15 mins
 
Folding a lattice pie crust is easy and looks beautiful!
Serves: 1 lattice top pie
Ingredients
  • 2 batches of perfect flaky pie crust
  • 1 egg
  • coarse sugar
Instructions
  1. Roll out dough for bottom, place in pan and fill pie crust with filling.
  2. Roll out dough for top, cut into ½-1 inch strips to your preference.
  3. Lay down the first 5 strips in one direction.
  4. Fold up strips 2 and 4 and lay down the first cross strip. Replace strips 2 and 4 and lift up strips 1, 3 and 5. Add cross strip.
  5. Repeat across entire pie turning when first half is done.
  6. Trim edge to ¾ inch all the way around. Crimp or finish edge to desired finish.
  7. Whip egg and brush crust with beaten egg with a pastry brush. Dust with coarse sugar and bake to recipe specifications.
3.2.2807


5 Comments


Follow Us On:

Instagram   |   Facebook     |   Pinterest
Easy Chicken Stir Fry

Easy Chicken Stir Fry

Tropical Jerk Chicken Rice Bowl

Tropical Jerk Chicken Rice Bowl

Korean Rice Bowl with Sweet Chile Soy Sauce

Korean Rice Bowl with Sweet Chile Soy Sauce

Homemade Chicken and Rice Soup

Homemade Chicken and Rice Soup

The Adventure Bite is a participant in the Amazon Services LLC Associates Program, an affiliate advertising program designed to provide a means for sites to earn advertising fees by advertising and linking to amazon.com. All our thoughts and opinions are our own and we are not paid for or mandated to provide a positive review.

About Dani Meyer

Dani is a mama to 2 wild little boys. She lives for new adventures & loves to experience new places through her stomach. She is passionate about helping families fall in love with real food, geeking out on food photography and reading obsessively.

« Easy Flaky Pie Crust Recipe (Step by Step Tutorial & Tips)
52 Fermented Foods To Make This Year »

Comments

  1. Karen @ The Food Charlatan says

    September 9, 2014 at 9:50 AM

    Do I spy rhubarb in there?? My favorite!! This is a great tutorial Dani! I love how you numbered everything, makes it easy! I totally need to put on my big girl panties and make a lattice crust already. Because it’s true, pie is just the best!

    Reply
  2. Katie says

    September 9, 2014 at 9:41 AM

    Wow, you make it look so easy! Thanks so much for sharing. I recently conquered making a truly flaky pie crust, so a lattice-top pie is next on my list!

    Reply
  3. Shashi @ runninsrilankan says

    September 9, 2014 at 5:50 AM

    Thanks so much for this step by step tutorial – this will definitely help me from ending with a knotted-up lattice crust – yup, it has happened!

    Reply

Trackbacks

  1. Easy Flaky Pie Crust Recipe (Step by Step Tutorial & Tips) | The Adventure Bite says:
    September 16, 2014 at 4:13 PM

    […] simple pinch crust edge, press it down with a fork or get fancy and weave a beautiful lattice top (How To Weave a Lattice Top (Easy Step by Step Instructions) Brush with a beaten egg and sprinkle some course sugar on top and bake according to your recipe […]

    Reply
  2. Mom's Famous Strawberry Rhubarb Pie | The Adventure Bite says:
    September 10, 2014 at 3:47 PM

    […] And tying together a perfect lattice crust… […]

    Reply

Leave a Reply Cancel reply

Your email address will not be published. Required fields are marked *

Rate this recipe:  


family photo Hi I'm Dani!
We help time crunched foodies create flavor packed simple recipes (and cocktails!) made with real ingredients! Our food travels keep our recipes fresh and inspired, while introducing you to unique "must visit" foodie destinations.

READ MORE
Never Miss A Recipe Again!
Join thousands of subscribers!
Subscribe By Email Here

Search

The Adventure Bite

Popular:

Healthy Baked Caprese Chicken (Gluten Free!)

Healthy Baked Caprese Chicken (Gluten Free!)

5 Minute Healthy Blueberry Muffins

5 Minute Healthy Blueberry Muffins

Almond Milk Chicken

Almond Milk Chicken

3 Ingredient Easy Teriyaki Sauce Recipe

3 Ingredient Easy Teriyaki Sauce Recipe

Massaged Kale Persimmon Salad

Massaged Kale Persimmon Salad

Easy Chicken Stir Fry

Easy Chicken Stir Fry

Easy Tandoori Chicken

Easy Tandoori Chicken

Slow Cooker French Dip Sandwiches

Slow Cooker French Dip Sandwiches

See More Popular Healthy Recipes

What’s Happening On Instagram

Load More...
Follow on Instagram
Recipes
Blogging Training
About Us
Partnerships
Contact Us
Privacy & Sponsorship Policy

CONNECT WITH US

FOLLOW US TO STAY UP TO DATE WITH OUR NEW POSTS.
Hi I'm Dani!
We help time crunched foodies create flavor packed simple recipes (and cocktails!) made with real ingredients! Our food travels keep our recipes fresh and inspired, while introducing you to unique "must visit" foodie destinations.

READ MORE

Copyright © 2018 The Adventure Bite