We are excited to help you get started with the secondary fermentation of your cider! If you missed the first post of How To Make Hard Cider and our discussion on Fermentation be sure to start there.
We are 3 weeks into the process and ready to transfer and add some spices.
By now your cider should be done with primary fermentation, and be well into the maturation stage. Primary fermentation is where most of the sugar gets converted into alcohol, and it should take a maximum of 8 days under optimal conditions.
It is common to mature cider or beer in a secondary fermenter so that it is not in contact with the trub bed that forms during primary fermentation. Trub is made up, in part, of dead and dying yeast cells that can leave bad flavors as they break down. The breakdown of yeast cells is known as autolysis. There is however a lot of debate over whether it is absolutely necessary to transfer into a secondary fermenter if the maturation stage is short. Many experienced homebrewers leave their brew in the primary fermenter for up to a month and report no detectable issues with flavor. We took this into account when we instructed you to leave your cider in the primary fermenter for three weeks.
Technical Process of Maturation
During the maturation stage, yeast is beginning to slow down and drop out of solution (flocculate). The sugar/food resources are becoming too scarce for further growth, and the increasing alcohol content becomes an inhospitable environment. There are many minor byproducts of yeast metabolization that add their own subtle yet distinct flavor to the brew. Some of these are good and add to the complexity of flavor. Others are not desirable and they are why maturation is so important.
During the maturation stage, the yeast begins to slow down and become inactive. They start to absorb some of the minor byproducts in an attempt to store up important nutrients before falling into a state of hibernation. Being patient enough to allow a few weeks of conditioning is normally enough to ensure that those unwanted byproducts are not detectable in the flavor profile of your finished cider.
If you have been following our instructions closely, your cider has already been maturing for three weeks. You could go ahead and bottle now if you didn’t want to add any extra spices and flavors, but then you wouldn’t be brewing a batch of “Three Kings”. That is the name we lovingly gave this cider.
Racking The Cider
These next steps will instruct you in the art of transferring/racking into a secondary fermenter and adding additional spices and flavor. If we were fermenting beer, and we were adding hops instead of spices at this stage, it would be called dry hopping. You may have heard of this term before.
First things first. Make sure your racking cane, food grade/surgical tubing, secondary fermenter, and brew bag are all well cleaned and sanitized!
Carefully take the cider out of storage making sure not to splash and disturb the trub bed.
You are going to be siphoning the cider out of the primary fermenter into the secondary fermenter. You will need gravity working in your favor for this. I like to place the primary fermenter on a chair, and the secondary fermenter on the floor for this reason. Placing the primary fermenter too high will make it difficult to siphon off all the precious cider while avoiding the trub in the bottom. It is best to be able to comfortably peer over the top of the fermentation bucket.
Don’t remove the lid and airlock just yet. Remember that any unnecessary contact with oxygen at this stage will cause oxidation and could ruin your brew. Now is the time to add your extra flavor ingredients.
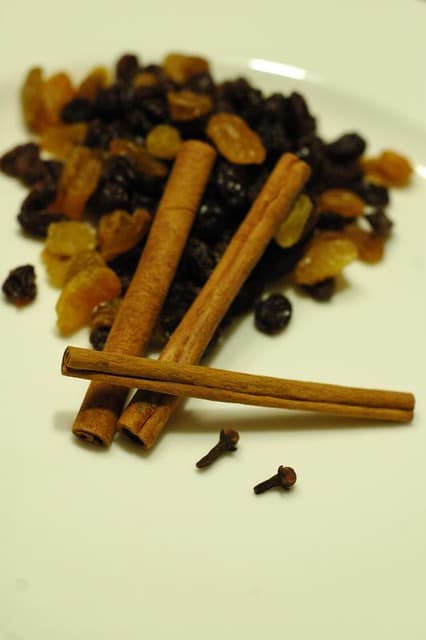
This is the list of ingredients again:
1 tablespoon vanilla extract
1 cup raisins
2 cloves
3 cinnamon sticks
You can measure out the tablespoon of vanilla extract and just drop it into the secondary fermenter. The motion caused by siphoning the cider will ensure it is well mixed.
Add the other ingredients to one sanitized or sterilized (by boiling) brew bag. Tie it closed and add it to the bottom of the secondary fermenter. If you are using a glass carboy as a secondary fermenter rather than a bucket, you will be working with a small bottleneck opening. In this case, you may need to shove the bag into the opening leaving enough out to still tie it up before poking it all the way in. Add the ingredients slowly, dropping it through the opening into the bag.
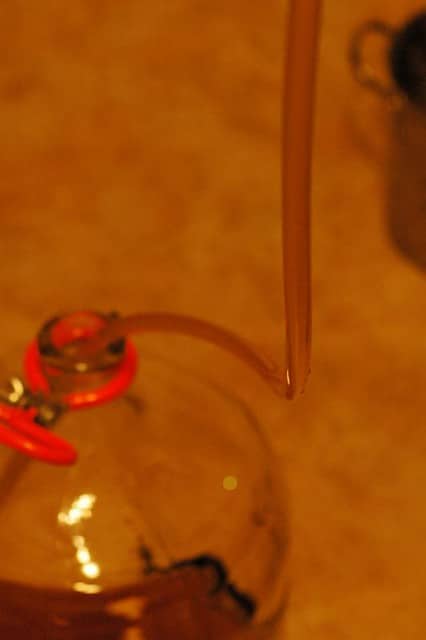
Now you are ready to siphon. Attach the hose to the curved end of your cane. The other end will have a special tip that causes the siphon to suck downward instead of upward. This prevents you from effectively vacuuming up the trub bed during the transfer.
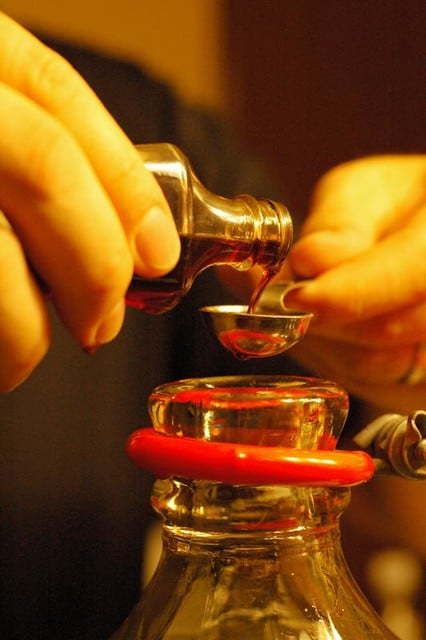
Carefully remove the lid from the primary fermenter. If you have a hydrometer and want to take a progress reading, now would be the best time to pull a sample off into your flask. You can use a sanitized turkey baster or use a specialized tool called a wine thief for this. Set the sample aside until you are done with the transfer to avoid your cider having prolonged contact with the open air.
Starting A Siphon
To start the siphon, you will need a way to draw the cider up through the racking cane and down the hose into the secondary fermenter. You will use water to start this process.
Make sure you are set up near a sink of some kind. Place a large pan on the floor that can be used to catch spent water and cider. Take a second pan and place it on the counter next to the sink. If your tap water is of good quality, you can simply fill this pan with water, but it is not a bad idea to fill it with sanitizer just to be safe. Place the cane end of the siphon into this pan, holding it upright. Begin filling the siphon from the hose end using the sink Fossett (If you have trouble filling the siphon this way, try keeping the cane and pan lower than the sink). When the siphon is filled, allow the water to start flowing back out of the hose into the sink. This causes a vacuum in the siphon that will begin to suck sanitizer up the cane, through the hose and out into the sink. Stop up the end of the hose with your finger before all of the sanitizers has been sucked from the pan.
By keeping your finger over the hose end, the siphon will remain filled with sanitizer. It works just like your straw did when you played with your soda as a kid. Carry the siphon over to the primary fermenter now. Place the cane end into the cider without disturbing the trub bed. hold the hose end over the catch pan on the floor and remove your finger. The sanitizer will begin to empty into the pan and cider will begin to fill the siphon. As soon as cider begins to flow into the pan, stop the hose with your finger again.
Finally, place the hose down in the bottom of the secondary fermenter and let the cider flow. Remember you want to minimize contact with oxygen as much as possible. For this reason, do not break up the surface of the cider in the primary fermenter more than needed, and keep the hose at the bottom of the secondary fermenter as it fills. Do not let the cane suck any air or your siphon will be broken and you will need to start over again.
When almost all of the cider has been siphoned away from the trub bed, you can carefully tilt the fermenting bucket so that you can get to the last drops of cider out. Make sure and stop before you suck up a bunch of dead yeast. A few chunks aren’t a big deal though.

I found this useful YouTube video showing how to start a siphon. It will help to clarify any steps you are still unsure about. You can also make this easier on yourself by recruiting a curious friend to help you manage all the steps. I’ve found most friends will work for a nice cold cider or beer.
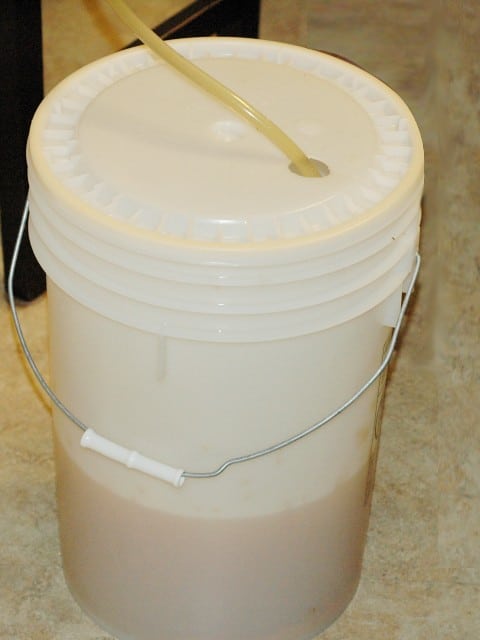
The last step is to seal up the secondary fermenter complete with an airlock filled with fresh sanitizer or vodka and store it away again.
Let the cider mature and become infused with the added flavoring ingredients for one more week. At the end of a week, you can decide if you like how the flavors have developed or if you think they need more time. The biggest factor with the ingredients added are the cloves. If you leave them in too long, you may end up with such a strong taste of clove that you have a topical numbing agent only your dentist will appreciate. Don’t worry though. If you just added the two cloves we recommended, everything will be just fine.
One last thing. If you pulled some cider off to take a hydrometer reading, now is the time to take the reading. If you need help remembering how to do that check out this tutorial again.

Then take your original gravity and your present gravity measurements and do a little math: (Original Gravity – Present Gravity) X 131 = ABV% (Alcohol By Volume)
Afterward, you can drink the sample. Don’t worry if it doesn’t taste like the cider you were expecting….it’s not done fermenting and becoming carbonated in the bottle quite yet. But we certainly won’t turn down the chance to taste the efforts of our hard work each along the way. Cheers!
Click here to learn how to bottle cider with us!


After fermenting to dryness, I then added a little ‘dosage’ or ‘priming’ sugar for a secondary fermentation and hence achieved a sparkle in the bottle or the barrel.
Hopefully i get a reply to this even though there has not been a comment in some time. Are the cloves necessary? I have never experience cloves (or I have and didn’t notice). Your comment about leaving it in too long makes me nervous and makes me feel like I should leave it out. What are your thoughts?
Hi Dylan!
Sorry for the delay, we were out for the holidays. You can definitely omit the cloves if you are concerned about it but as long as you don’t ferment it dramatically longer than the 1 week we suggest, 2 cloves will be just fine. If you want it a bit stronger just take a draw out every couple days to make sure it isn’t going too clovey for you.
Hope that helps!
Dani
Okay. The cider is in primary, but I was reading through this again and have another question. Sorry! When priming with honey, how do you ensure it gets well mixed? Honey is thick and even when I pour hot liquids over it, it usually just stays at the bottom. Do I need to dilute it first?
Thanks, again!
Hey Roger,
Kevin is working on the bottling post this week. Look for it next thursday or saturday! He’ll have all the details on that for you then.
Thanks!
Dani
Sorry, one more question. I used to brew iced tea with cloves and would use about 6 cloves in a gallon, but they would only sit in the tea 24 hours. 2 cloves seems like a really small amount. Are you just giving it aroma or should I actually be able to taste the cloves? Be aware that in our family, any time we cook we double the spices and sometimes that’s not enough.
Hi Roger,
Thanks for your comment. I have not used cardamom before, but if I were to use it I would use the whole pod. If you wing it, add conservatively and taste the cider every couple of days so you can decide when to rack it off the spices. You can always add more, but you can’t reverse over-adds. Another option is to make a tea first. Pay attention to liquid volumes and spice-add ratios along with how much time you steeped for.
Regarding your cloves question. Cloves have a numbing effect that can be very overpowering. I’d rather not be able to detect a spice than to mess up the whole batch of cider by over adding. That being said, I had no problem detecting clove in this recipe. Again, just taste the cider every few days and you can make the call as to when to rack off. Just a side note, we just brewed an Imperial Pumpkin Porter at the brewery I work at. We used just two teaspoons of whole cloves for 5 barrels (that is 155 gallons).
Hope that helps!
Thank you! I’m excited to try this as my next home brew!
Thanks so much for the comment Roger! Do let us know how it comes out for you!
Dani
It seems the more I think about this the more questions I have. So, if I use cider instead of apple juice, would it be okay to add peptic enzymes to this recipe, or will that cause problems with the “spicing” in the secondary? Also, have you given any thought about the additions of tannins?
Hi Roger,
Kevin said that yes you could probably use peptic enzymes without trouble but to check your label for specific instructions as they can vary in how much you should add. We have always just let it aged and been quite happy with its clarity after proper aging.
Regarding tannins, we prefer to just work with the apple juice as is and alter it as little as possible. Adding tannin powder is certainly done and we would recommend referencing other recipes and your home-brew shop for quantity recommendations.
If you wanted to naturally add more tannins you could go with a fresh pressed cider, potentially even unfiltered, to add more pulp matter. If you go with fresh cider though you would want to consider adding campden tablets for killing the wild yeast.
Hope that helps!
Dani
Thanks, again! I’ll let you know how it turns out!
Has anyone considered adding cardamom to the spice mix? If so, how much?
Ah wow, this is brilliant. Thorough, ambitious, fascinating! Never thought about doing a cider myself, but now I’m reconsidering 🙂
Thank you Irina! We do love fermentation around here. And cider is such an easy introduction too. If you decide to try it, let us know.
Such detailed and informative steps! I haven't made cider – but loved reading this post
Thanks Shashi!